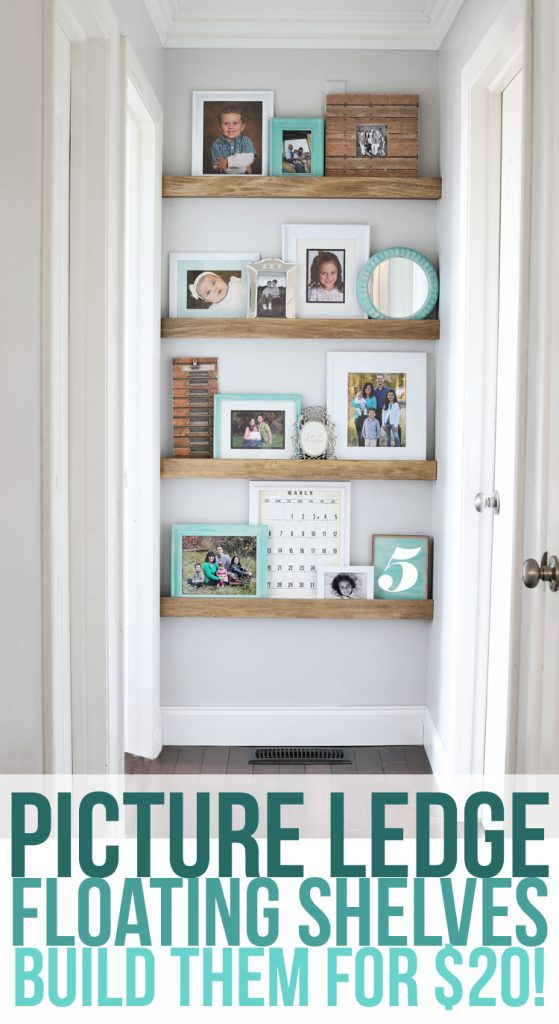
These picture ledge floating shelves can be built in just a few hours for around $20.

I’ve been wanting to decorate the end of my hallway for some time now. I’ve also been wanting a place to display favorite family photos, so I decided I wanted to build picture ledges to go across the back wall of the hall.
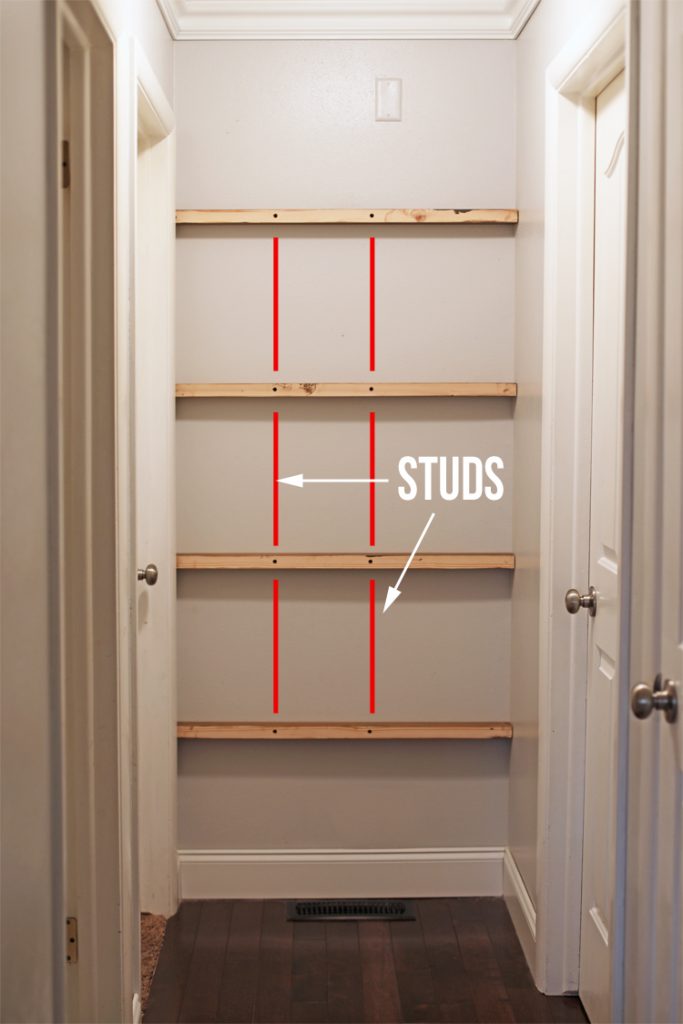
The problem we faced is that we only had 3.5 inches to work with because the door on the left side of the hall is really close to the back wall. This meant that we couldn’t build traditional picture ledges that have a piece of wood on the back and the front. It would eat up too much of our space and then the shelf wouldn’t be deep enough to hold picture frames. So after mulling the problem over, we came up with another way to build floating picture shelves that eliminated the need for the back piece and freed up just enough room to make the shelves work in our narrow space.
How do you make floating shelves?
It’s actually a pretty simple project and the wood will only cost you about $20, so if you already have the screws and wood stain, it’s a very cheap DIY project!
Supply List
- Two 2″x3″x96″ Pine Boards
- Four 1/2″x3″x3′ Poplar Boards
- 3 Inch Screws
- Drill With Countersink Bit
- Studfinder
- Level
- Sandpaper
- Wood Conditioner
- Wood Stain (I used Weathered Oak and Briarsmoke)
- Polycrylic or Polyurethane (optional)
Step 1: Measure the width of your hallway and cut the 2×3’s down to fit. Most hallways are about 3 feet wide, so you should be able to get two shelves out of one 8 foot 2×3 board. Cut the 1/2×3″ poplar boards to the width of the hallway as well. Measure where each shelf will go to be sure the boards fit snuggly even if your walls aren’t perfectly straight.
Step 2: Sand the wood, focusing on the 1/2×3″ piece, since it’s what you’ll see most of.
Step 3: Use wood conditioner to ensure the stain goes on evenly. Just follow the directions on the can. Stain the 3″ sides of the 2×3 boards and the entire 1/2×3 boards using the stain color of your choice. I used Weathered Oak first, then did a very light coat of Briarsmoke on top of that. I chose not seal my wood with polyurethane since it’s just decorative and doesn’t need the extra protection, but you definitely could if you wanted to.
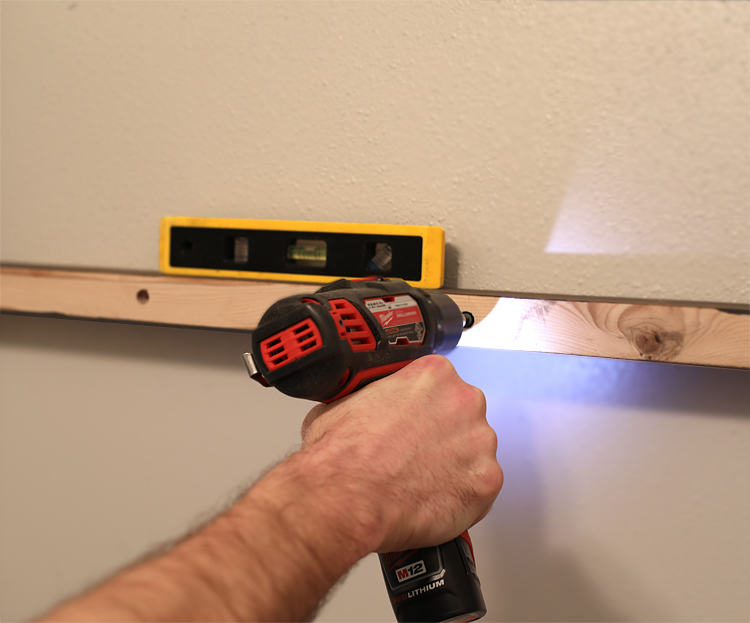
Step 4: Find the stud location in the wall using a studfinder and mark the location on the 2×3’s.
Step 5: Using a drill fitted with a countersink bit, drill holes through the narrow side of the board, aligning the holes with the markings you made for the studs.
Step 6: Place the 2×3 board against the wall and use a level to make sure it’s correctly positioned. Insert the screws into the countersunk holes and attach the shelves to the wall.
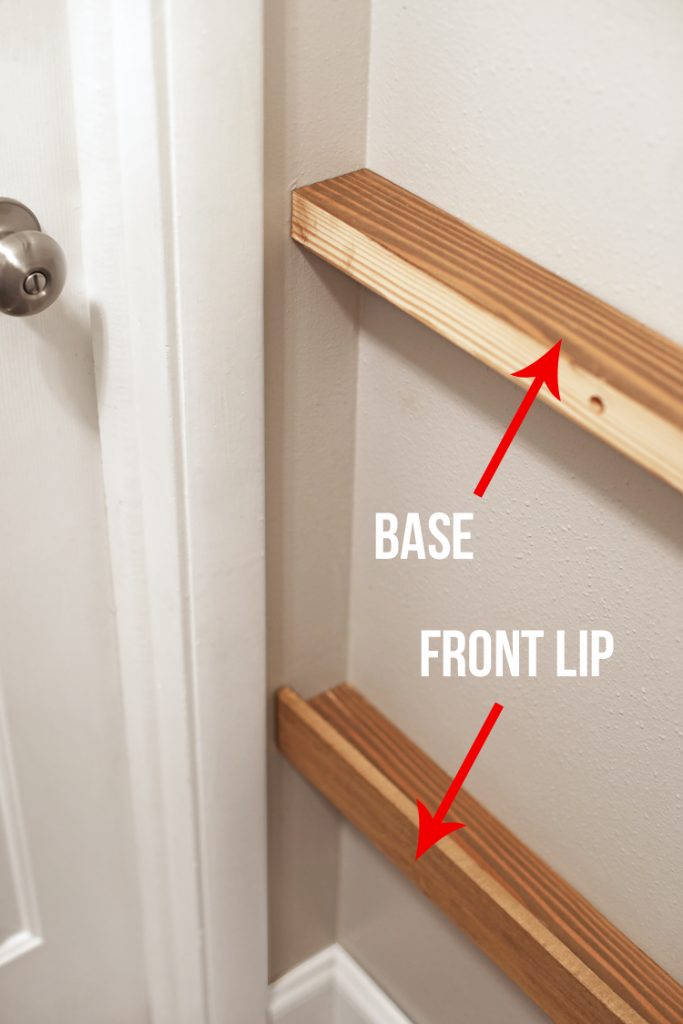
Step 7: Face nail the front lip (1/2×3 board) in place using a finish nailer. The bottom of the board should sit flush with the bottom of the 2×3, forming an L-shape. Optional: use wood putty to fill in the nail holes. I skipped this step because the nails we used are so small I can’t even see them!
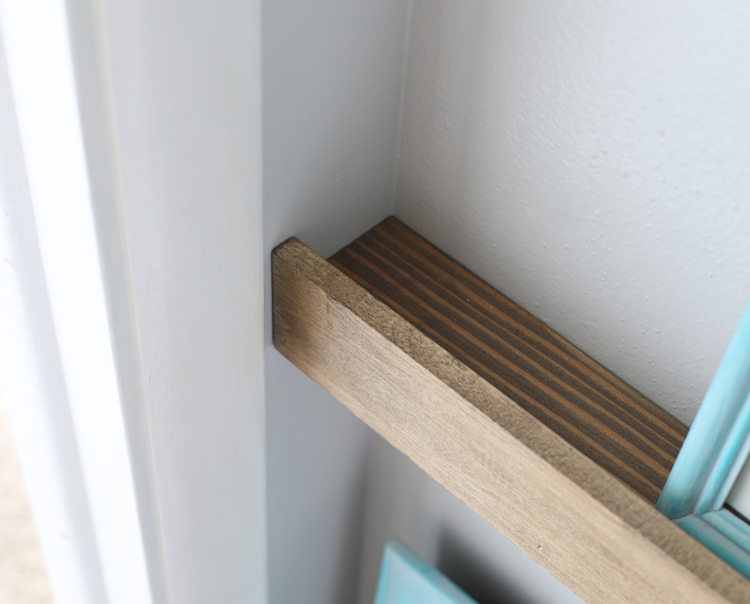
Here’s a close-up of the finished shelf:
The overall shelf with lip measures 3 inches deep, which gives you 2.5 inches of usable shelf space, which is just enough to be able to layer two picture frames next to each other.

To decorate my shelves, I gathered up a variety of photo frames that I already had laying around and painted them all in coordinating white, blue and wood tones. I think the trick to styling shelves like this is to vary the height and shape of the frames, but keep a cohesive color scheme to make it look pulled together.

I’m so thrilled with how much bang we got for our buck with this project. Suddenly the hallway is one of my favorite places in the house! I smile every time I walk by these pretty photo ledges and see our treasured family photos.

Like this project? Pin it so you don’t forget it!

Comments & Reviews
I LOVE this! What a simple, fun and CUTE decor addition! Thanks for the idea! 🙂
Looking for the pantry shelves
Here ya go! https://www.thecraftpatchblog.com/how-to-build-pantry-shelves/
How much space between shelves did u use
It’s about 12 inches.
I’m looking to do the same project but my door is even closer to the wall than yours. I measure it out and I believe I will end up with 1.5 inches of usable space to place pictures on. I’m sure this wont be enough for layering but do you think it will still be enough to set a picture frame on?
I’m not sure that’ll be enough space… unless you measure the depth of your frames or buy super thin frames I think you’ll have a hard time being able to use it.
how high is the lowest shelf from the floor?
It’s about 18 inches off the floor.
how far is the bottom shelf from the floor?
sorry i wrote again! Thank you for answering! I am totally doing this project! (my husband is) 🙂 thanks again
What color is the grey wall? It’s a perfect shade!
It’s Sherwin-Williams Repose Gray lightened 50%.
This looks so cute, I wish I had a spot to do this!! Do you remember what color your walls are?!?! I’ve been trying to find the perfect color haha and I like this one
It’s a color I got off of the “oopsie” paint shelf, but it’s identical to Sherwin-Williams Repose Gray.
I love this! My husband and I are about to attempt this in our new home. About how much spacing is between your shelves? My ceilings are 10’ high and my door frames are 8’ high. Also at what height did you start your bottom shelf? TIA
I have standard 8 foot ceilings. The bottom shelf is 18 inches from the floor and each shelf is about 18″ inches from the bottom of one shelf to the bottom of the next shelf. Hope that helps!
If my door is literally almost right next to the wall would I still be able to manage this?
You do need a few inches, otherwise your ledges won’t be deep enough to hold a picture frame.
I built these following your directions. They came out perfect! Thank you so much for posting this idea. It really transformed the blank space going into my bedroom. I started 24” from the floor and then each shelf is 20” apart. I wish I could post a picture.
How tall are your ceilings?
Standard 8 foot ceilings
I absolutely love your colors!! Where did you get the number 5 sign??
I made it with my Silhouette machine.
Beautiful shelves. Why did you decide to use two different stain shades?
I used two stains purely for looks. I wanted the in-between color that mixing the two gave me.
This is pretty random but do you know what color paint is on your wall?! We’ve been looking for a simple gray that actually looks gray and not brown or pink. If you happen to know the name I would be super grateful if you were willing to share! Thanks!
It’s Sherwin-Williams Repose Gray lightened 50%.
Love these shelves! How far into the 2×3 did you countersink the screws?
I don’t know that an exact size matters… it just needs to be enough that the screws are down in the wood so they don’t bump into the front face pieces when you put those on.
Do you remember where you got the mirror? I love it!
It was from the Dollar Tree years and years ago!
We are planning on doing these soon. So when you say they are about 12” of shelf space (top to bottom) does that out the actual line for the shelves/screws at about 18” apart like? Like screws 18” from floor, then every 18” from there? Trying to space it properly
Hey, what paint color is that on your walls? Love it!
It’s Sherwin-Williams Repose Gray lightened 50%.
Do you use a brush or a cloth to apply stain?
Either works great!
Just wondering how hard was it to stain the poplar board? I’ve read that it’s the most difficult wood to stain…
It wasn’t hard at all. We picked through the boards to find ones without a lot of green in them and just stained like normal.