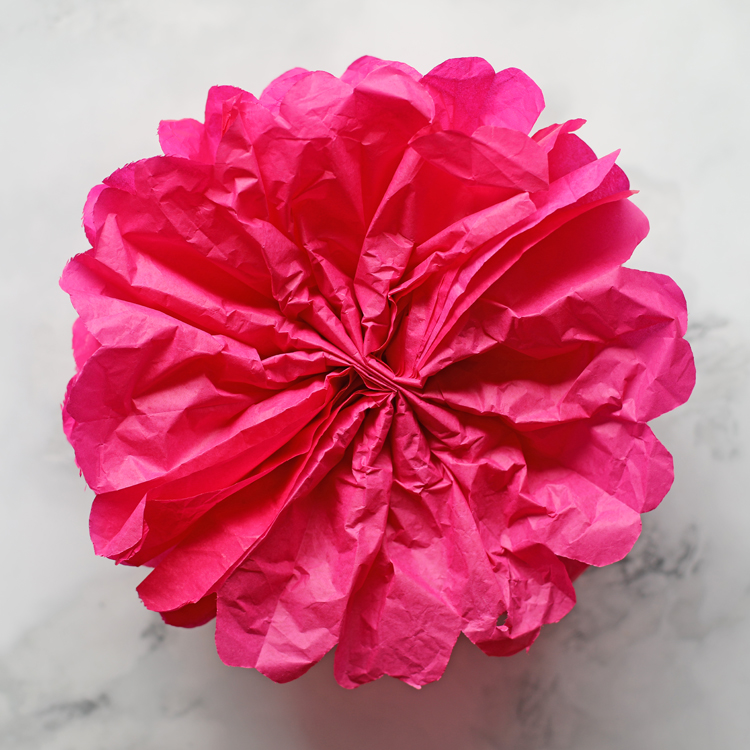
Tissue paper flowers are fun and easy to make with the help of this step-by-step photo and video tutorial. This is your ultimate guide to making, hanging, and decorating with tissue paper flowers!

Have you ever made tissue paper flowers? They are such an easy, inexpensive craft and can be used in so many different ways. This article is the ultimate guide to everything you want to know about tissue paper flowers. I’m sharing ALL of the information you need in one place!

How do you make tissue paper flowers?
Materials Needed
- Colorful Tissue Paper
- Scissors
- Stapler + Staples
- Ruler or Measuring Tape
Instructions
Step 1: Stack several layers of tissue paper neatly in front of you. (Refer to sizing chart below)
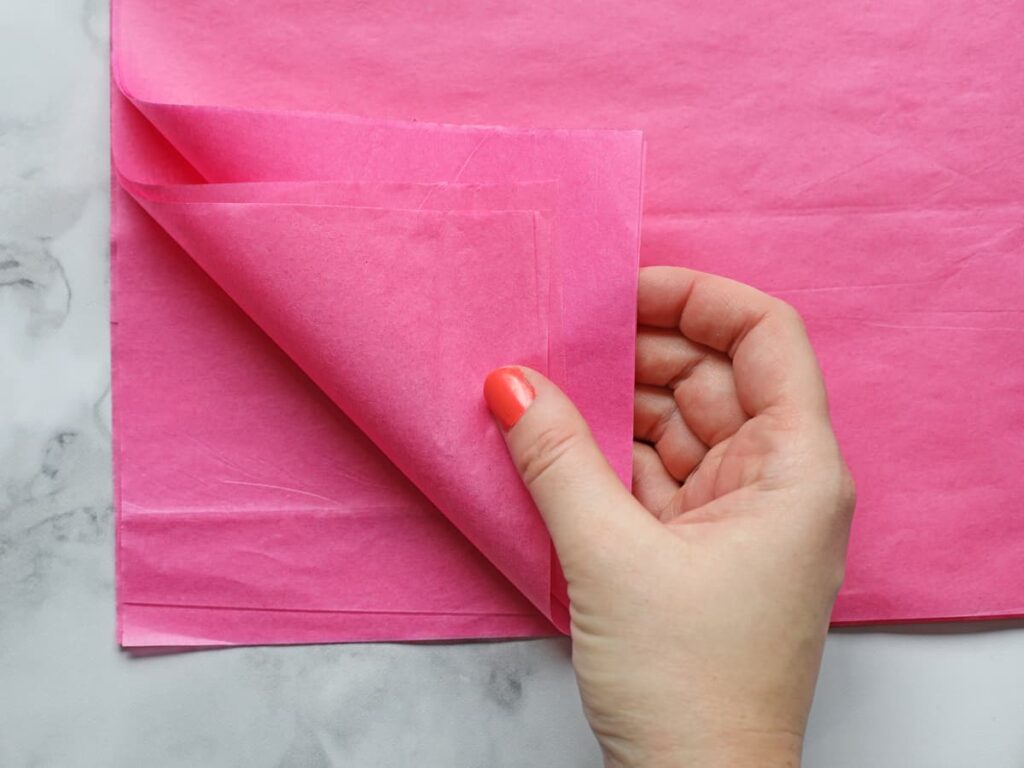
Step 2: Starting at the short end, accordion fold 1 inch sections of the tissue paper until the whole length of the tissue paper is folded together.

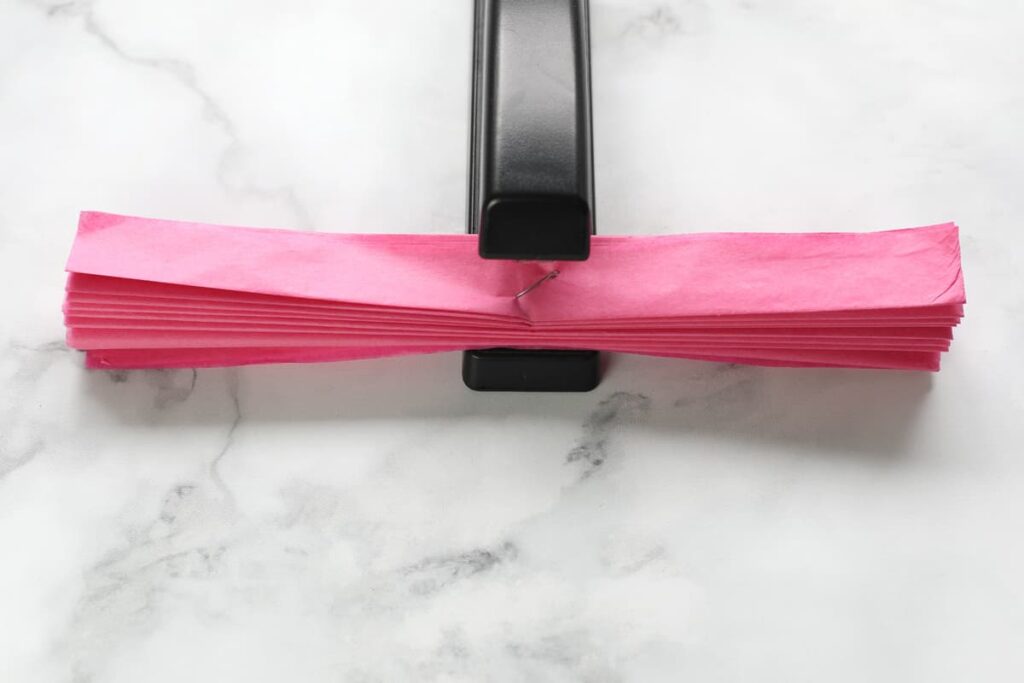
Step 3: Secure the center using a stapler. Be sure the staple goes through all layers of the tissue paper.
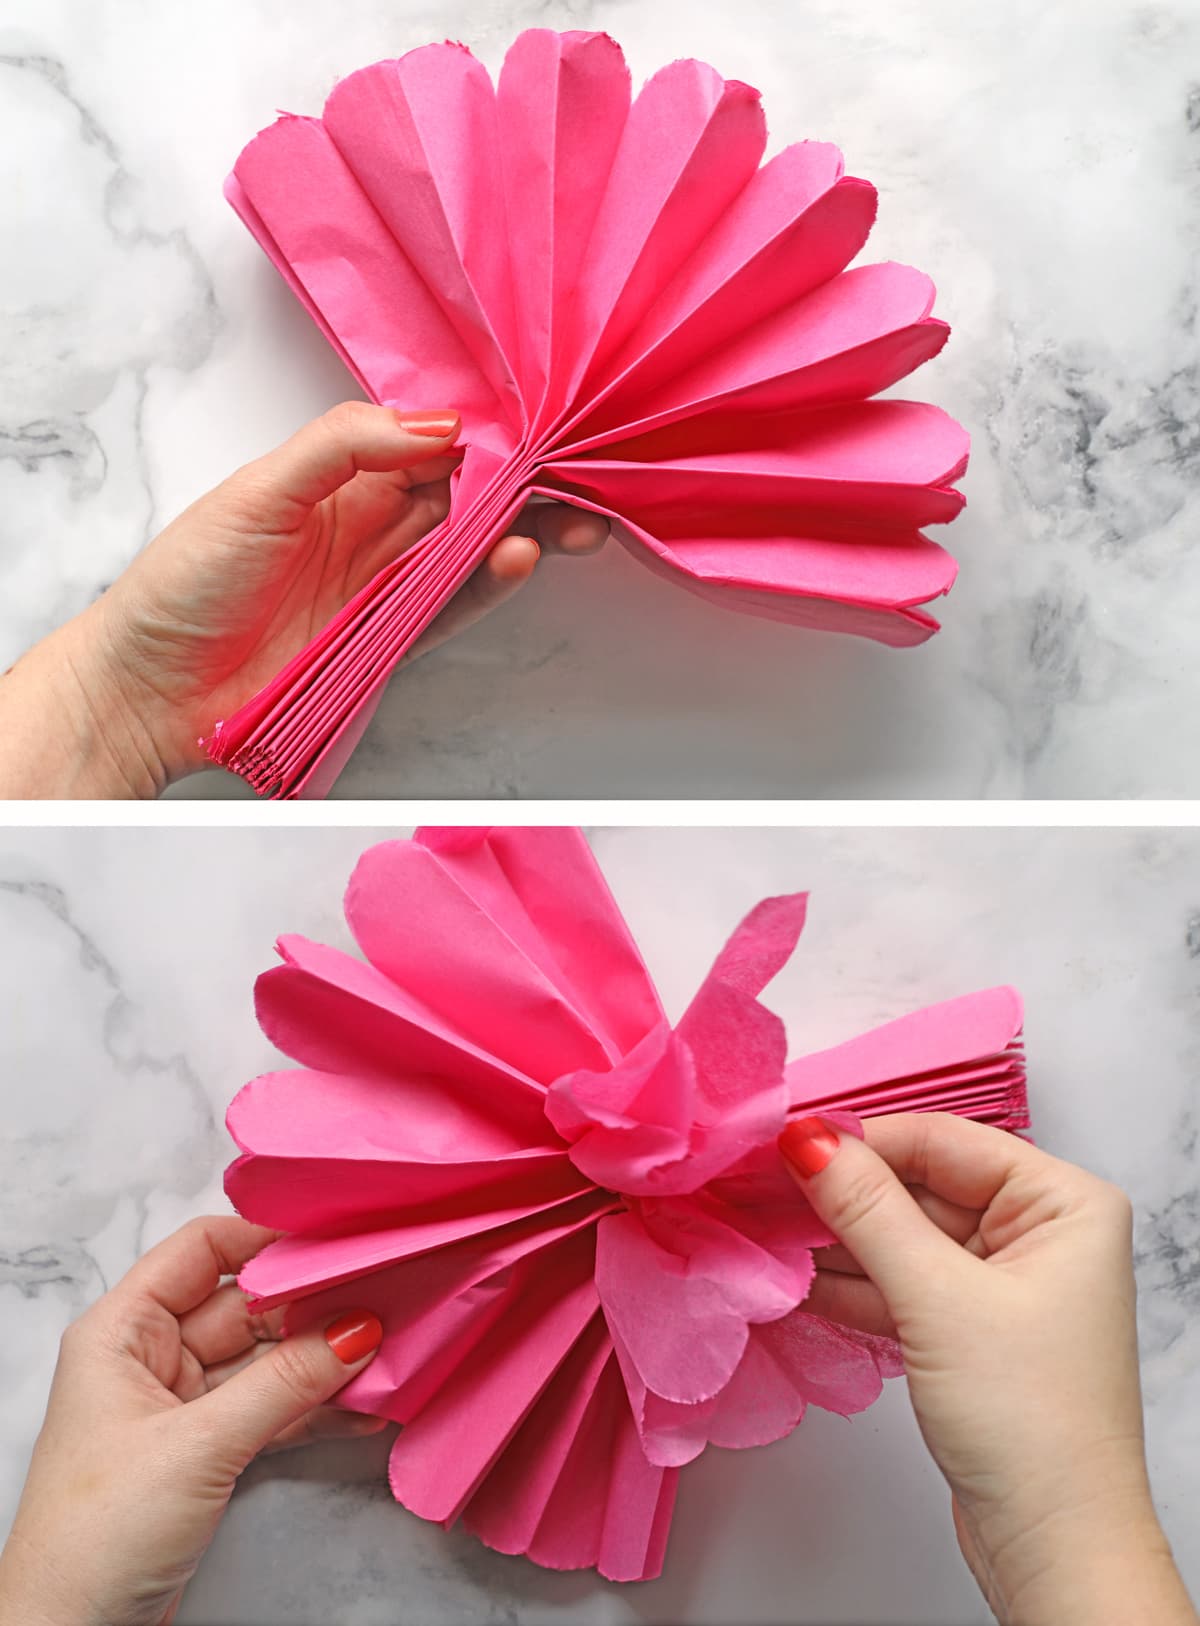
Step 4: Use scissors to shape both ends of the tissue paper. Scroll down a bit to see a chart of different ways you can cut the ends and how the flower will look.

Step 5: Fan out the folds and begin separating each layer. Fluff and shape the flower until it looks pretty.
Just in case any of that was confusing, I’ve put together a short video tutorial so you can see exactly how to make tissue paper flowers.
Tissue Paper Flower Video Tutorial
How do you make BIG flowers out of tissue paper?
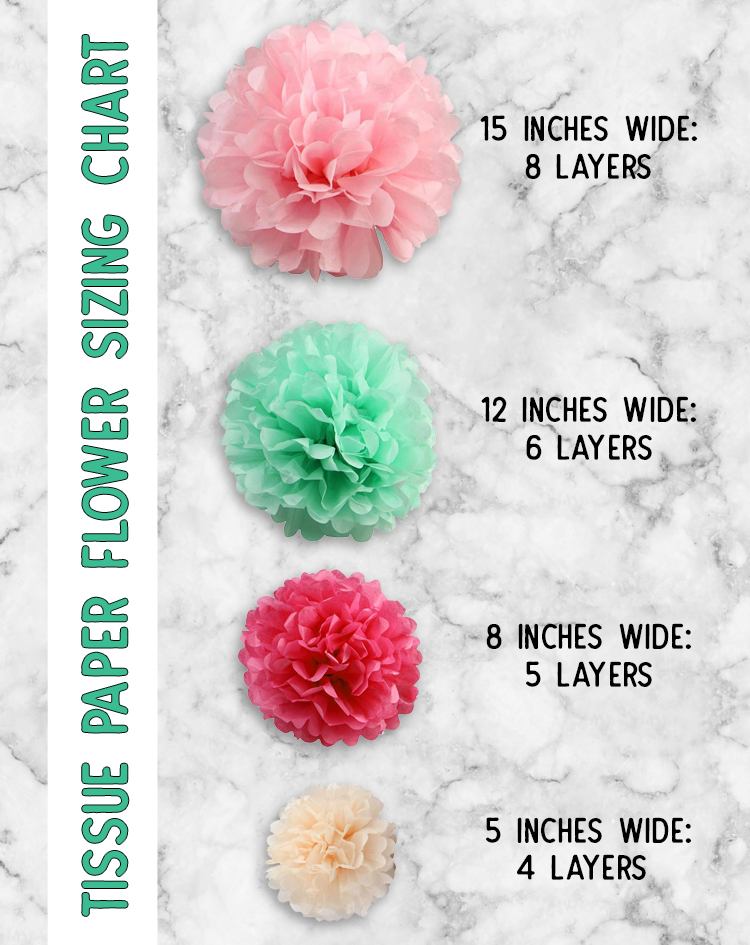
You can easily make tissue paper flowers any size you want by adjusting the starting width of your tissue paper and how many layers you use. The larger the flower, the more layers of tissue paper it needs to look full and pretty. Here is a handy reference chart to give you an idea of sizing. The first number is how wide the tissue paper is after you’ve accordion folded it. The second number is how many layers of tissue paper you should use.
How do you make different tissue paper flower shapes?
It’s easy to change the look of your tissue paper flowers by changing the way you cut the ends and how thick you make the folds. I folded tissue paper flowers four different ways below and the four resulting flowers look completely different!
I cut very large petals on the first flower and folded slightly thicker folds and the resulting flower is fluffy and larger scale. The second flower is the very classic scalloped edge. The third flower has pointy edges and the fourth flower has fringe-cut edges.

Another way you can change it up is by folding more than one color of tissue paper together like I did in the last flower example above. Layer a smaller strip of tissue paper over a larger strip to have a different colored flower center or layer different colors that are all the same size for a striped or ombre effect. There are so many different possible variations. Let your imagination go wild!
How do you make tissue paper pom poms?
In my mind, tissue paper flowers are flat on the back and tissue paper pom poms are ball-shaped. There are two ways to make a tissue paper pom pom that is nice and round. You can either make two flowers the same size and attach the flat sides together to get a nice sphere –or– double the number of tissue paper sheets you start with. Sometimes this still leaves the finished shape a little less than perfectly round, so I prefer attaching two flowers together.
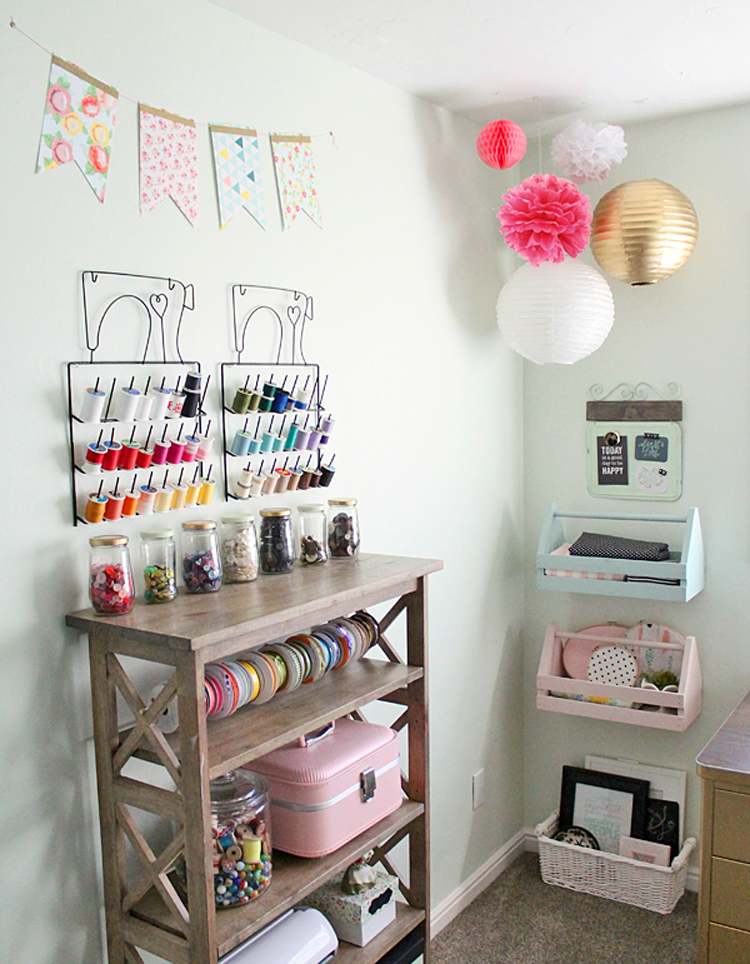
How do you hang tissue paper pom poms?
Here are several ways to hang your newly-made tissue paper pom poms:
- Before fluffing the tissue paper (between steps 4 and 5 above), tie a ribbon or fishing line around the middle of the folded tissue paper right where the staple is. After you fluff the tissue paper, the string will be accessible for hanging. I love these clear Command Hooks (affiliate link) that are specially made for party decor. I used them to hang the tissue paper flowers and paper lanterns in one corner of my craft room. See the photo below.
- Use masking or packing tape to attach flat-backed tissue paper flowers to the wall temporarily.
- If you would like to display the tissue paper flowers long-term, use push pins or Command Strips to attach them to the wall. Tape may come undone over time. Just hide the push pins in the fluffy parts of the tissue paper and they won’t even show.
Where’s the best place to buy tissue paper?
Dollar Tree is my favorite place to buy tissue paper, but if you are planning to make a hundred tissue paper flowers for a wedding or something, I suggest buying it from Amazon because they have the best color selection. There are plenty of different sellers, but the target price you’re looking for is about 5-7 cents per sheet. Dollar Tree’s tissue paper is 4 cents per sheet, but it comes in limited colors.
How do you decorate with tissue paper flowers?
This is the fun part! There are so many different ways to use tissue paper flowers. Below are a few creative ideas from around the web. Click on the links below each picture for more information about each tissue paper flower project. If there’s no link, the original source is no longer available.


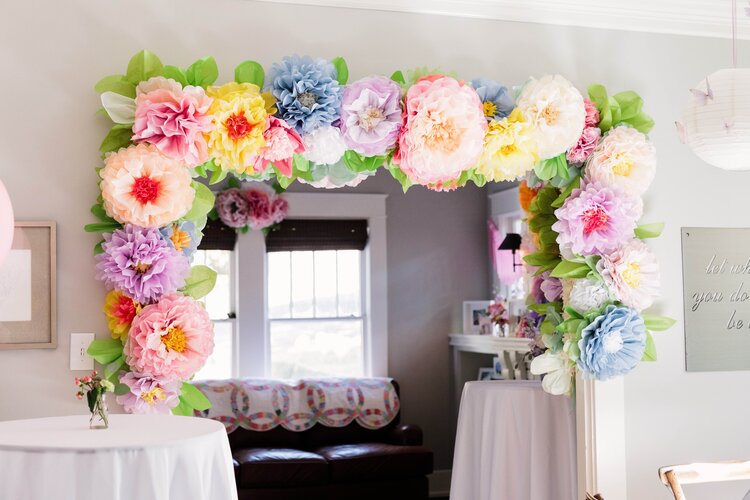
See why I love tissue paper flowers so much? They are just so inexpensive and versatile and pack a visual punch! Go ahead and give them a try the next time you have the creative itch.
If you like these tissue paper flowers, check out my tutorial for making flowers out of cardstock paper. They turn out so cute!
Like it? Pin it!

Comments & Reviews
I did these many years ago, but you show so many neat variations. Such an inexpensive way to decorate! Thanks for sharing
Love this Jen!! We need to make several for Tiana’s wedding! Thank you!! 😘
I know tissue paper is quickly messed up by water. However anyone ever sprayed it a color like spray paint or air brushing?
I recently brushed the tips of the tissue paper with metallic gold paint and it worked well. However, I don’t think the tissue paper would have held up to anything too wet.
OMG, I love all these ideas and I could have used these instructions this past weekend for my daughters birthday party. The directions that came with the tissue flowers I bought were terrible but I finally figured it out on my own. I will definitely be trying some of the ideas you have for my next party!
I also make these with cheap plastic table cloths. They are waterproof and are just as beautiful!
Genius, especially if you’re throwing an outdoor party!
This is a great craft! Thank you sooooo much! I’m only 12 and I have to teach this to a group of about 30 people and it really helped out.
Good girl! You are a few years older now, and probably are hooked on crafting 🙂
Thank you sooooo much! I’m only 12 and I have to teach this to a group of about 30 people and it really helped out.
Do you have the link for your video tutorial? I’m struggling to get these fluffed without tearing them. Thanks!
That step IS tricky. I’ve found it helps to keep the folds looser so they come apart easier. I’ve updated the post to include the video tutorial. It’s near the center.
Making these for my sister-in-law’s gender reveal party, I’m so glad I found this! I made them years ago but forgot how to, and never mastered the art of making larger ones!
Thank you!
This sounds awesome.Thanks for the great article.
I remember making these with my sisters when was really young. I wanted something more than stuffing tissue in a bag. So I made some following your instructions and by the fourth one it was a perfect gift bag topper. A real show stopper thank you so much!
Its wonderful! Thanks so much! I was searching up DIY flower decorations for mothers day… my mum loves flowers. This would be perfect for the decor!
Thank you for infromation! Beutifull
My cousin showed me how to do these and when I did my first one by myself, I. Was. Hooked. I encourage others to try it.
Love how many choices you showed. Cant wait to try them all. Thank you
I will love to learn
Thank you 😊
Loved those thank you doo much !!!!
Great Guide & Videos! Beautiful results! 🥰